【Unity】ボタンを実装する方法。Button()やToggle()メソッドを紹介します。
どうも、だらはです。
今回はボタンの実装方法を紹介したいと思います。
具体的には以下のメソッドを紹介します。
- Button()メソッド
- RepeatButton()メソッド
- Toggle()メソッド
Button()メソッドは、Label()メソッドと使い方が似ています。
ついでなので、Label()メソッドの記事も参照頂けたらと思います。
押す動作に反応するボタン
ラベルと違い、ユーザのクリックに反応できるのがボタンです。
UnityEngine.GUIクラスのButton()メソッドを使います。
使い方はLabel()メソッドと基本的には同様です。
public static bool Button(Rect position, string text)
public static bool Button(Rect position, Texture image)
public static bool Button(Rect position, GUIContent content)
public static bool Button(Rect position, string text, GUIStyle style)
public static bool Button(Rect position, Texture image, GUIStyle style)
public static bool Button(Rect position, GUIContent content, GUIStyle style)OnGUI()メソッドでButton()メソッドを呼び出して使います。
以下は、ボタン押下でゲームシーンを変更するスクリプトです。
ボタンを押下し、離した瞬間にゲームシーンが遷移します。
◆ボタン押下でシーンを変更するスクリプト
using UnityEngine;

public class StartButton : MonoBehaviour
{
    [SerializeField]
    private string SampleScene;

    private string text = "ボタンを押してね。Scpaceキーでも良いです";
    private void OnGUI()
    {
        Rect rect1 = new Rect(10, 10, 400, 30);
        GUI.Label(rect1, text);

        rect1.y = 40;
        rect1.height = 50;
        if (GUI.Button(rect1, "Push Start")
            || (Input.GetKey(KeyCode.Space)))
        {
            Application.LoadLevel(SampleScene);
        }
    }
}
押し続ける動作に反応するボタン
次は押されている間ずっと、trueを返すボタンです。
RepeatButton()メソッドを使います。
public static bool RepeatButton(Rect position, string text);
public static bool RepeatButton(Rect position, Texture image);
public static bool RepeatButton(Rect position, GUIContent content);
public static bool RepeatButton(Rect position, string text, GUIStyle style);
public static bool RepeatButton(Rect position, Texture image, GUIStyle style);
public static bool RepeatButton(Rect position, GUIContent content, GUIStyle style);基本的にはButton()メソッドと同じ使い方です。
以下は、ボタンを押下すると文字を表示するスクリプトです。
◆ボタン押下で文字を表示するスクリプト
using UnityEngine;

public class ButtonRp : MonoBehaviour
{
    private void OnGUI()
    {
        Rect rect2 = new Rect(10, 100, 400, 100);
        if(GUI.RepeatButton(rect2, "べろべろ"))
        {
            rect2.y += 70;
            rect2.x += 180;
            GUI.Label(rect2, "ば~!");
        }
    }
}
有効/無効のトグルボタン
有効と無効の状態を切り替えるトグルボタンは、Toggle()メソッドを使います。
上述したButton()メソッドに対して、有効/無効の引数が追加されます。
public static bool Toggle(Rect position, bool value, string text)
public static bool Toggle(Rect position, bool value, Texture image)
public static bool Toggle(Rect position, bool value, GUIContent content)
public static bool Toggle(Rect position, bool value, string text, GUIStyle style)
public static bool Toggle(Rect position, bool value, Texture image, GUIStyle style)
public static bool Toggle(Rect position, bool value, GUIContent content, GUIStyle style)
とてもシンプルです。
以下に、トグルボタンを押下すると文字を表示するスクリプトを書きました。
◆トグルボタン押下で文字を表示するスクリプト
using UnityEngine;
public class ButtonTgl : MonoBehaviour
{
private bool FlgBtn = false;
private void OnGUI()
{
Rect rect3 = new Rect(10, 400, 400, 50);
if (FlgBtn = GUI.Toggle(rect3, FlgBtn, "押すなよ?"))
{
rect3.y += 50;
GUI.Label(rect3, "押すなと言っとろーが!");
}
}
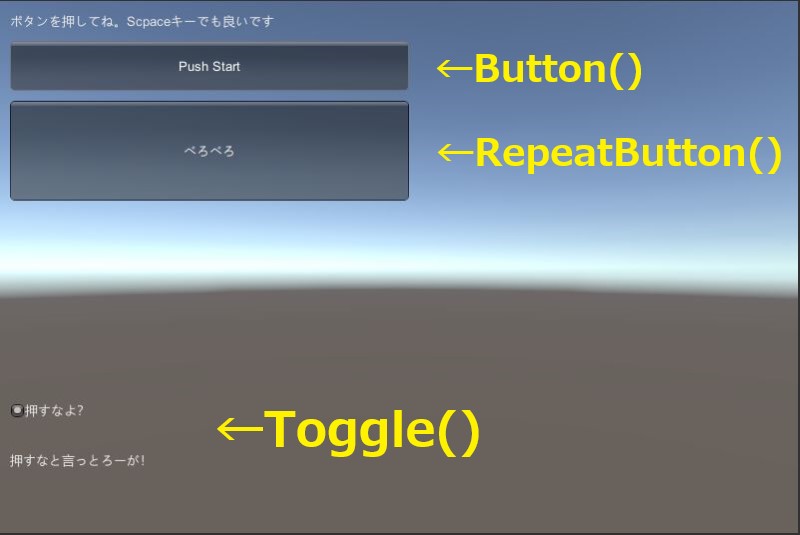
}◆実行結果

最後に
いかがでしたでしょうか。
今回は以下のメソッドを使ってボタンを実装しました。
- Button()メソッド
- RepeatButton()メソッド
- Toggle()メソッド
ただし、今回の実装方法だけではスマホなどの解像度違いには対応できません。
以下の記事にて、解像度違いにも対応できるようになりますので参照頂けたらと思います。