【Unity】コピペOKのアスペクト比対応。スマホ向けに背景やUIの大きさを自動で調整する方法。
どうも、だらはです。
今回はスマホ向けでは必須の機能「アスペクト比対応」について紹介したいと思います。
基本的にはコピペでOKな筈なので、是非参考にして頂けたらと思います。
アスペクト比対応の手順
早速ですが、手順を記します。
後追いで画像ファイルにて補足します。
◆対応手順
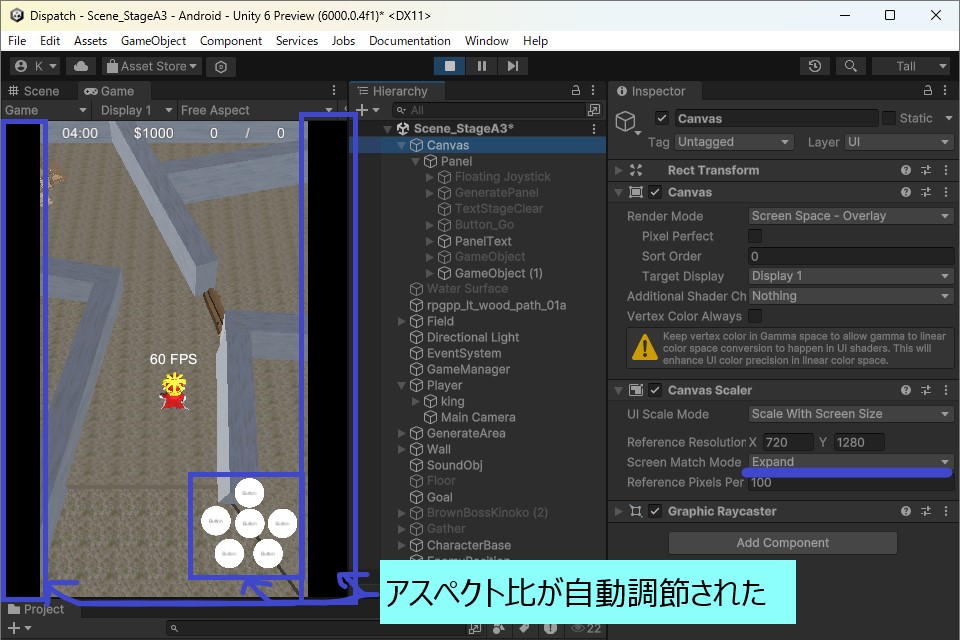
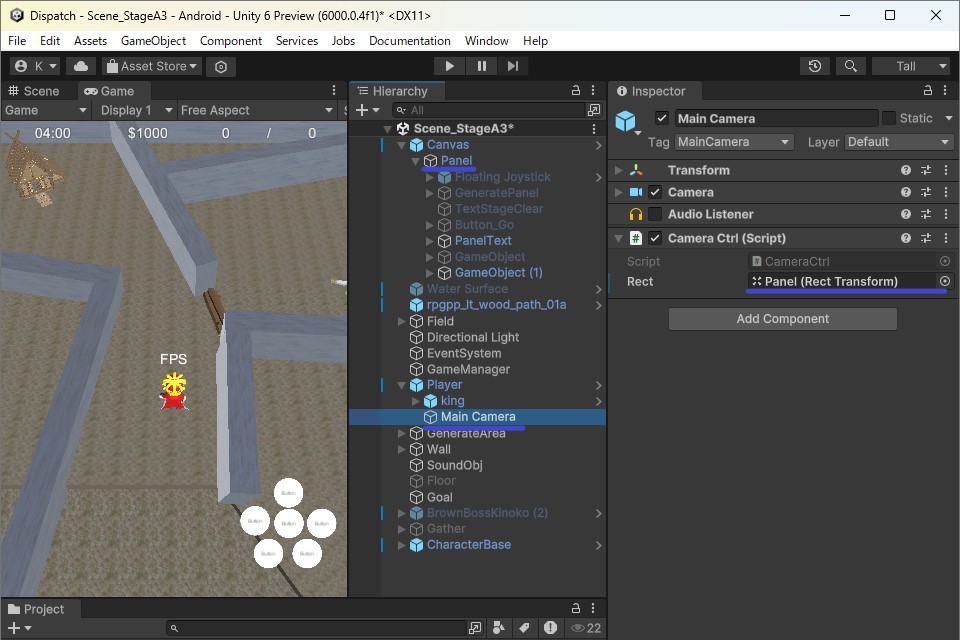
- Canvasの直下にアスペクト比調整用のPanelを作成する。(図1)
- Main CameraにCameraCtrl.csスクリプトをアタッチする。(図1)
- Canvas Scalerの設定Screen Match ModeをExpandに設定する。(図2)
以上です。
2でアタッチするCameraCtrl.csは後述します。
◆図1
◆図2
◆AdjustAspect.cs
using System.Collections;
using System.Collections.Generic;
using UnityEngine;

public class CameraCtrl : MonoBehaviour
{
    private Camera cam;
    private float width = 720f;
    private float height = 1280f;
    private float pixelPerUnit = 100f;
    [SerializeField] RectTransform rect;

    void Awake()
    {
        cam = GetComponent<Camera>();
        cam.orthographicSize = (height / 2f / pixelPerUnit);

        float aspectScr = (float)Screen.height / (float)Screen.width;
        float aspectImg = height / width;

        float ratioWidth = 1f;
        float ratioHeight = 1f;

        //横に隙間が空く
        if (aspectImg > aspectScr)
        {
            //描画範囲を指定して横の隙間を切り取る
            ratioHeight = height / Screen.height;
            ratioWidth = width / (Screen.width * ratioHeight);
            cam.rect = new Rect((1f - ratioWidth) / 2f, 0f, ratioWidth, 1f);

            //Canvasの大きさを変更する
            Vector2 anchorMin = rect.anchorMin;
            anchorMin.x = (1f - ratioWidth) / 2f;
            rect.anchorMin = anchorMin;

            Vector2 anchorMax = rect.anchorMax;
            anchorMax.x = 1 - ((1f - ratioWidth) / 2f);
            rect.anchorMax = anchorMax;
        }
        else
        {
            //描画範囲を指定して縦の隙間を切り取る
            ratioWidth = width / Screen.width;
            ratioHeight = height / (Screen.height * ratioWidth);
            cam.rect = new Rect(0f, (1f - ratioHeight) / 2f, 1f, ratioHeight);

            //Canvasの大きさを変更する
            Vector2 anchorMin = rect.anchorMin;
            anchorMin.y = (1f - ratioHeight) / 2f;
            rect.anchorMin = anchorMin;

            Vector2 anchorMax = rect.anchorMax;
            anchorMax.y = 1 - ((1f - ratioHeight) / 2f);
            rect.anchorMax = anchorMax;
        }
    }
}
本スクリプトによりUIの位置が正しく表示されるようになります。
また、プログラム内にコメントで注釈しましたが、描画範囲を指定して隙間を切り取る処理を入れました。
補足
なお、CameraのViewport Rectで描画範囲を切り取った個所は、実機では意図しない出力となる場合があります。
対策として、描画用のCameraとは別でCameraを実装、Depthを調整し、画面全体を黒色などで初期化する等の処理をしてやると良いです。
(Main CameraのDepthを-1, 画面外初期化用のCameraのDepthを-10とするなど)
追記(2025.7.16)
もしかしたら、GUIとは別に背景画像を配置する場合は、「Canvasの大きさを変更する」以降の処理はコメントアウトしたほうが良いかもしれません。
具体的には以下の箇所です。
//Canvasの大きさを変更する
//Vector2 anchorMin = rect.anchorMin;
//anchorMin.x = (1f - ratioWidth) / 2f;
//rect.anchorMin = anchorMin;

//Vector2 anchorMax = rect.anchorMax;
//anchorMax.x = 1 - ((1f - ratioWidth) / 2f);
//rect.anchorMax = anchorMax;
以上、だらはでした。
追記(2025.7.26)
画面下部に広告を入れたいなどで、カメラのViewport Rectを(0,0,1,1)から(0,0.15,1,1)などのようにしたい場合にも対応できるようにしました!
また、カメラに表示しない部分は意図しない描画がされてしまうことを防止するため、新たにカメラを作成し、Depthをメインカメラより低い値にすると良いです。
(Main CameraのDepthが0の場合、カメラに表示しない部分の更新用のCameraのDepthは-1に設定する)
using UnityEngine;

public class AspectRatioManager : MonoBehaviour
{
    [Header("アスペクト比")]
    [SerializeField] RectTransform rect;
    [SerializeField] float width = 1280f;
    [SerializeField] float height = 720f;
    [SerializeField] float pixelPerUnit = 100f;

    Camera cam;

    void Awake()
    {
        //アスペクト比設定
        AspectSet();
    }

    //アスペクト比設定
    void AspectSet()
    {
        if (rect == null) rect = GameObject.Find("Canvas/Panel").GetComponent<RectTransform>();

        cam = GetComponent<Camera>();

        float aspectScr = (float)Screen.height / (float)Screen.width;
        float aspectImg = height / width;

        float ratioWidth = 1f;
        float ratioHeight = 1f;

        //横に隙間が空く
        if (aspectImg > aspectScr)
        {
            cam.orthographicSize = (height / 2f / pixelPerUnit);

            //画面に対する画像Y軸の倍率
            ratioHeight = height / Screen.height * (1 - cam.rect.y);

            //画像Y軸を画像X軸の倍率で調整(横の隙間を切り取る)
            ratioWidth = (width / Screen.width) / ratioHeight;

            if (cam.rect.y == 0)
            {
                cam.rect = new Rect((1f - ratioWidth) / 2f, cam.rect.y, ratioWidth, 1f);
            }
            else
            {
                if ((1f - ratioHeight) / 2f <= cam.rect.y)
                {
                    cam.rect = new Rect((1f - ratioWidth * (1 - cam.rect.y)) / 2f, cam.rect.y, ratioWidth * (1 - cam.rect.y), 1f);
                }
                else
                {
                    cam.rect = new Rect((1f - ratioWidth) / 2f, cam.rect.y, ratioWidth, 1f);
                }
            }
        }
        else
        {
            cam.orthographicSize = (width / 2f / pixelPerUnit);

            //画面に対する画像X軸の倍率
            ratioWidth = width / Screen.width;

            //画像Y軸を画像X軸の倍率で調整(縦の隙間を切り取る)
            ratioHeight = (height / Screen.height) / ratioWidth * (1 - cam.rect.y);

            if (cam.rect.y == 0)
            {
                cam.rect = new Rect(0f, (1f - ratioHeight) / 2f + cam.rect.y, 1f, ratioHeight + cam.rect.y);
            }
            else
            {
                //調整結果が初期Viewport Rectの値より下回る場合
                if ((1f - ratioHeight) / 2f <= cam.rect.y)
                {
                    cam.rect = new Rect(0f, cam.rect.y, 1f, ratioHeight - cam.rect.y + (1f - ratioHeight) / 2f);
                }
                else
                {
                    cam.rect = new Rect(0f, (1f - ratioHeight) / 2f, 1f, ratioHeight);
                }
            }
        }
    }
}